No bookmark
HELPING A COMPANION
  • It helps if you were able to observe the point at which the victim was caught in the avalanche and the last seen point, i.e. the point where the person disappeared. This can narrow down the “primary search area” in very large avalanches. 

  • The first thing to do is clarify who will coordinate the rescue, who will conduct an avalanche transceiver search, and who will help by preparing shovels and probes and supporting the searchers. The specific allocation of roles depends on how many rescuers are available in relation to the number of burial victims.  

  • Finally, everyone involved in the rescue must switch their avalanche transceiver to either “search” or “standby”, or “off” if they preparing the shovels and probes and following the searchers. 

  • If enough helpers are on site, one person should report the accident and alert the organized avalanche search and rescue (emergency call 112 ) while the search is underway. This person should also switch their avalanche transceiver to “standby” or “off” and make the emergency call away from the avalanche deposit zone; during this call, they must provide the exact location (coordinates) and number of burial victims. 

  • If there is no cell phone signal, the companion search has priority. If there are not enough rescuers or you are alone, you must decide whether you should first alert search and rescue or first try to rescue the accident victim(s). 

  • The searchers stand side by side in a line and walk systematically over the avalanche deposit zone (or the primary search area) in parallel search strips. According to the number of rescuers and the size of the search area, the search-strip width can be between 20 and 40 meters. If you are alone, you must walk down the search area in an S-shaped  or zigzag  pattern (meandering). 

  • If you observed the accident from above, the primary search area is searched from the top down. If you are below or to the side of the avalanche deposit zone (2), you start searching from there. 

SAVING TIME SAVES LIVES

The survival curve shows that most burial victims are alive once the avalanche comes to a stop. This survival curve drops rapidly after 15 to 18 minutes. This is why it is so important that the search for avalanche burial victims goes smoothly and quickly. And that is exactly why practice is so essential. (Source: Brugger et al.)

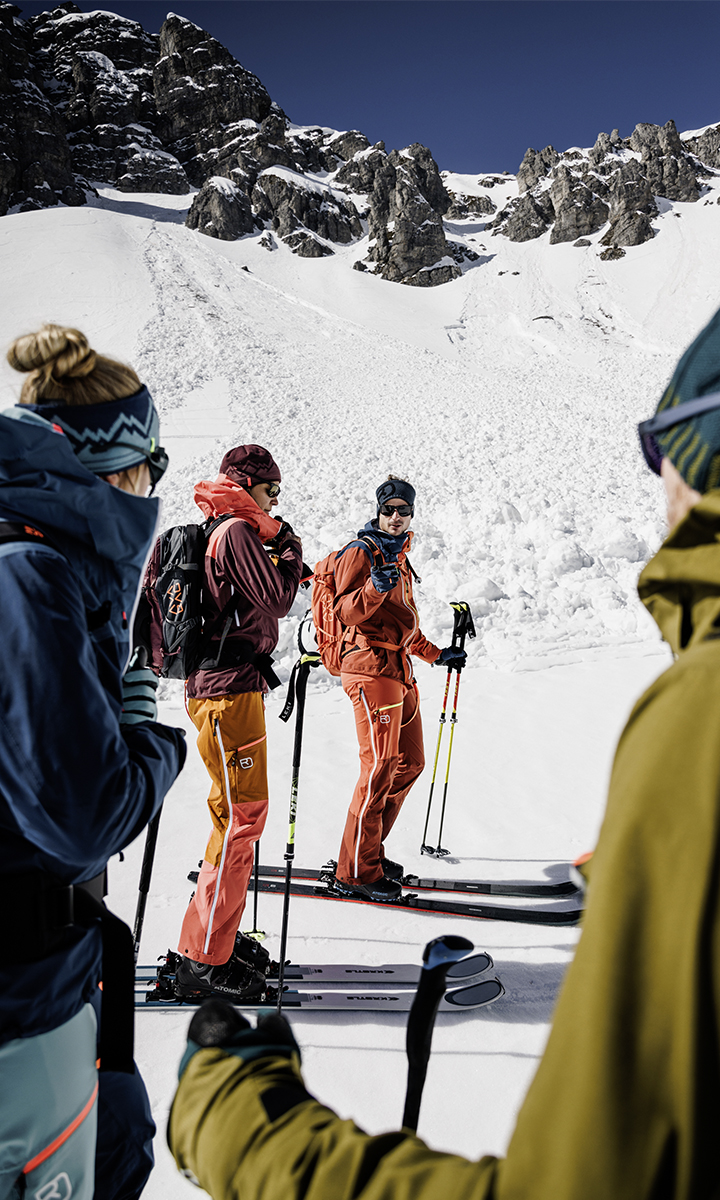
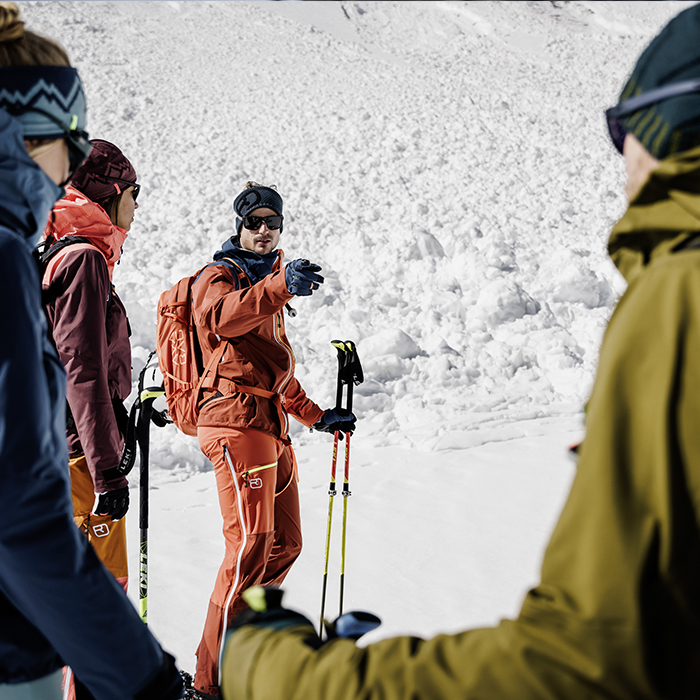
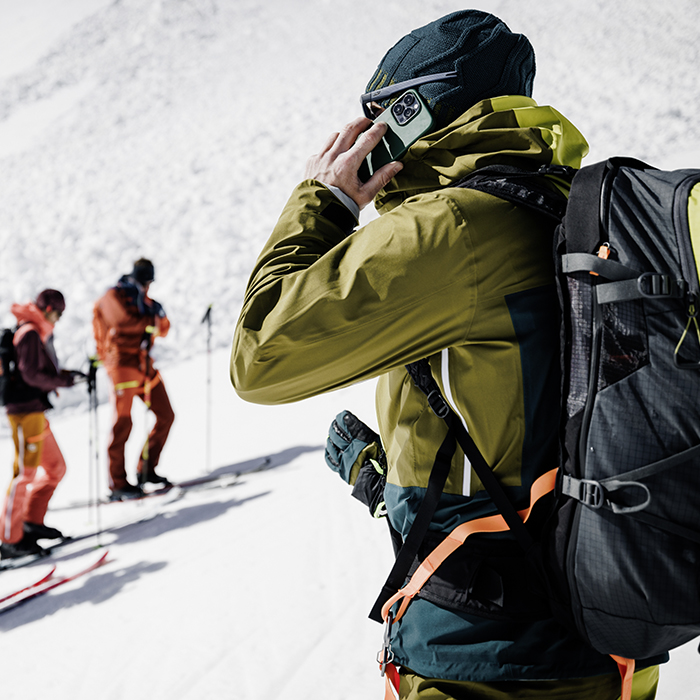
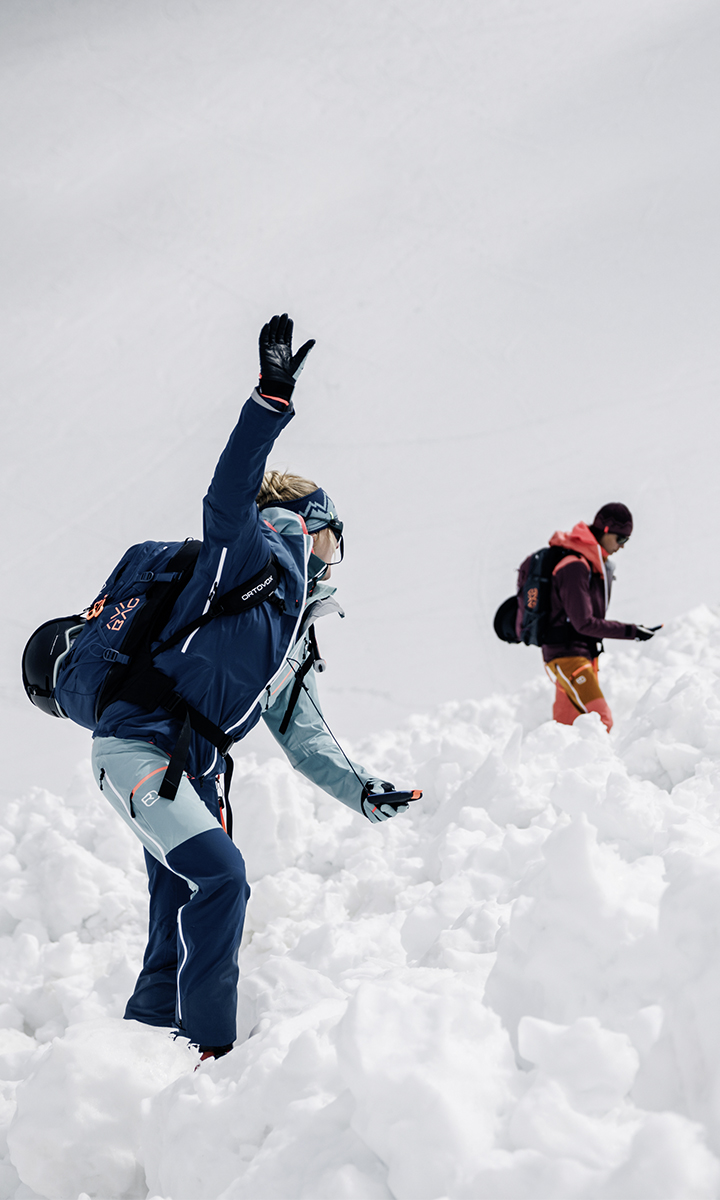
COORDINATING THE COMPANION RESCUE

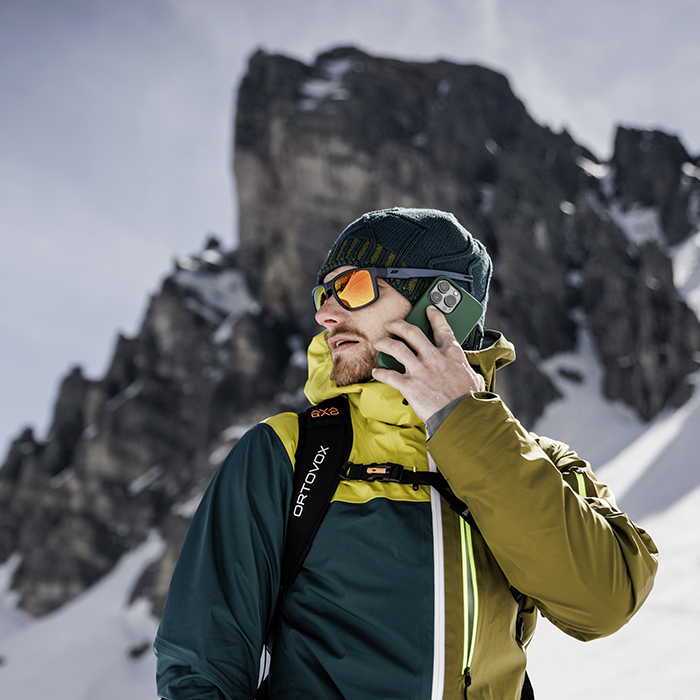
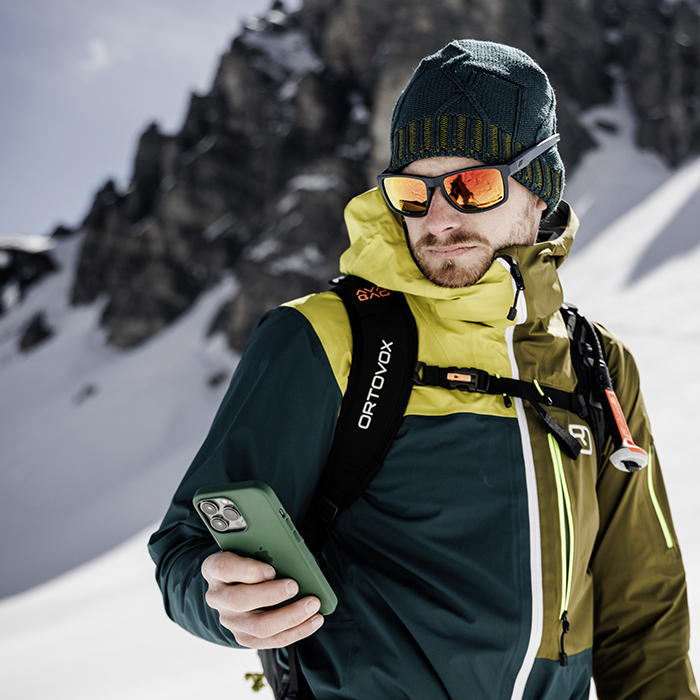
As a rule, the most experienced person should coordinate the rescue and make the emergency call. However, in individual cases someone else can be appointed to call the search and rescue service.

APPOINTING ROLES SWITCHING OVER AVALANCHE TRANSCEIVERS EMERGENCY CALL EMERGENCY NUMBERS NO SIGNAL

APPOINTING ROLES TO RESCUERS

First, the coordinator assigns the searchers and ensures that everyone has set their avalanche transceivers to either “search”, “standby” or “off” and are taking up the relevant positions. The coordinator also assigns helpers and instructs them to follow the searchers with shovels and probes at the ready.

If there are enough rescuers, the search-strip width can be narrowed down to 20 meters; if the search area is very large, modern avalanche transceivers can handle a strip width of up to 40 meters. Another person is instructed to make the emergency call. If resources are tight, the leader should coordinate the rescue and make the emergency call.  

SWITCHING OVER AVALANCHE TRANSCEIVERS

The decision about whether the helpers can switch their transceivers to “off” must be made by the coordinator, depending on whether there is danger of a secondary avalanche. As a rule, secondary avalanches immediately after an initial avalanche are extremely rare. However, if they cannot be ruled out, all helpers should switch their devices to “standby” or “search” mode. In standby mode, modern devices will automatically switch to “transmit” after 1.5 to 2 minutes in the event of a burial.

MAKE AN EMERGENCY CALL

When alerting the emergency services, you must first and foremost provide the exact location of the accident; the best way is to provide the coordinates shown on your cell phone or determined using a map. To help, remember the “Four Ws and How Many”:

  • WHAT happened? Avalanche accident with burial or a fall? 
  • WHERE did it happen? Provide coordinates, give an exact description of your location using a map 
  • HOW MANY people are affected? Provide the number of burial victims 
  • WHO is reporting the accident? Provide your contact details and remain available for calls and questions 
  • WHEN did it happen? Provide the exact time of the accident 

IMPORTANT EMERGENCY NUMBERS

In Europe, the pan-European emergency number is 112. This number will always connect you to a rescue coordination center that will forward the accident report to the appropriate rescue services. 

The various alpine states  also have their own alpine emergency numbers that will connect you directly to mountain search and rescue: 

  • Austria: 140 – Mountain search and rescue (in Vorarlberg you can also dial 144) 

  • Switzerland: 1414 – Swiss Air-Rescue Rega (if using a SIM card that is not from a Swiss network operator, call +41 333 333 333) / 144 – Valais mountain rescue 

  • France: 15 – Chamonix mountain rescue 

  • USA: 911

EMERGENCY CALL WITH NO SIGNAL

If your cell phone has no signal, you should turn it off. When you turn your phone off it usually asks whether you would like to make an emergency call. It should show an emergency call option once it is switched back on at the latest. In this mode, every cell phone can access all of the networks available in the reception area without the need of a pin.  

If an emergency call is still not possible, you must seek another location with better network coverage (e.g. on a hill or closer to infrastructure).

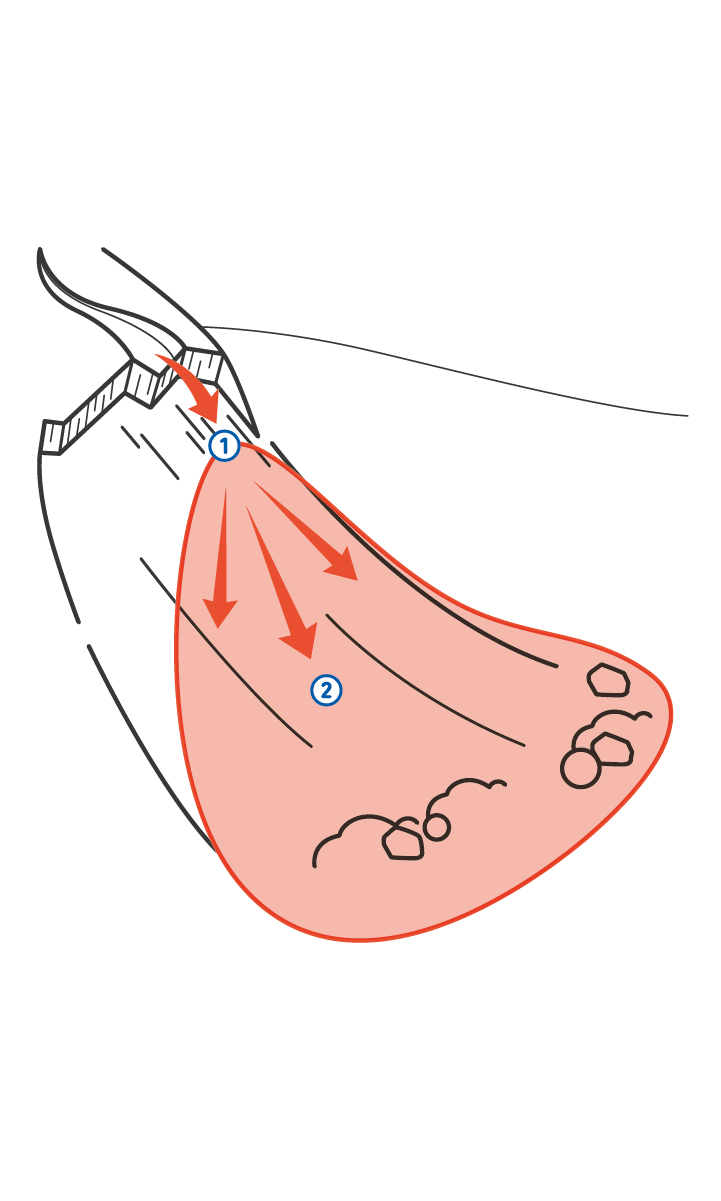
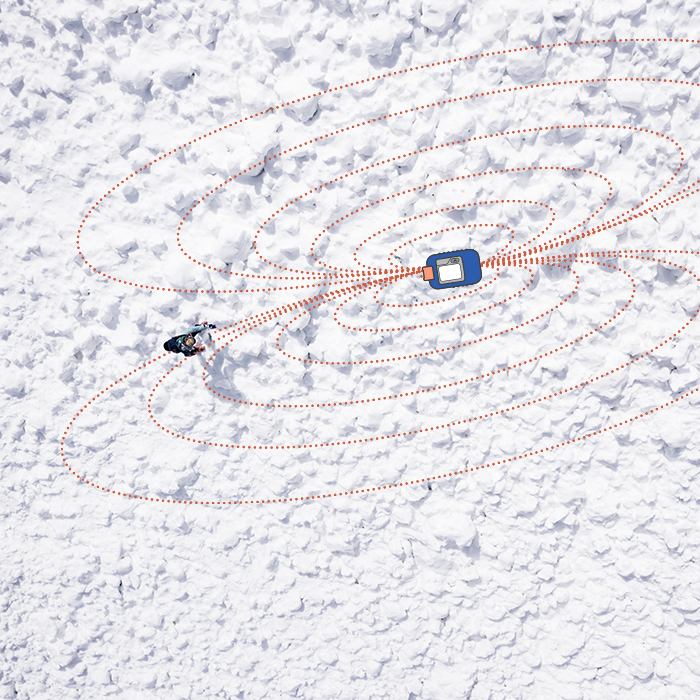
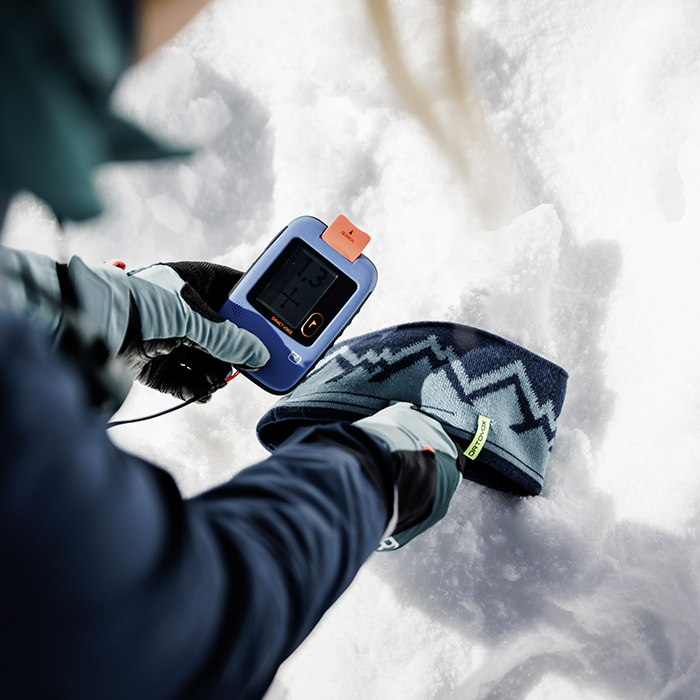
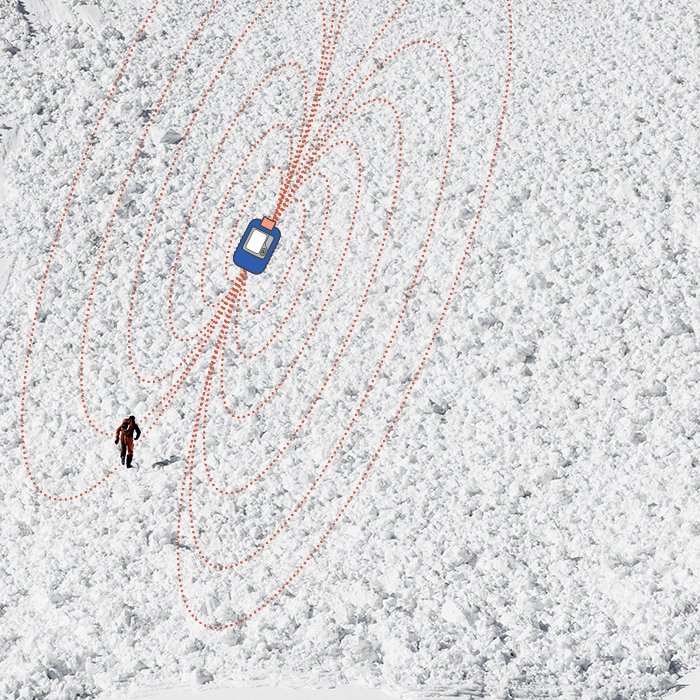
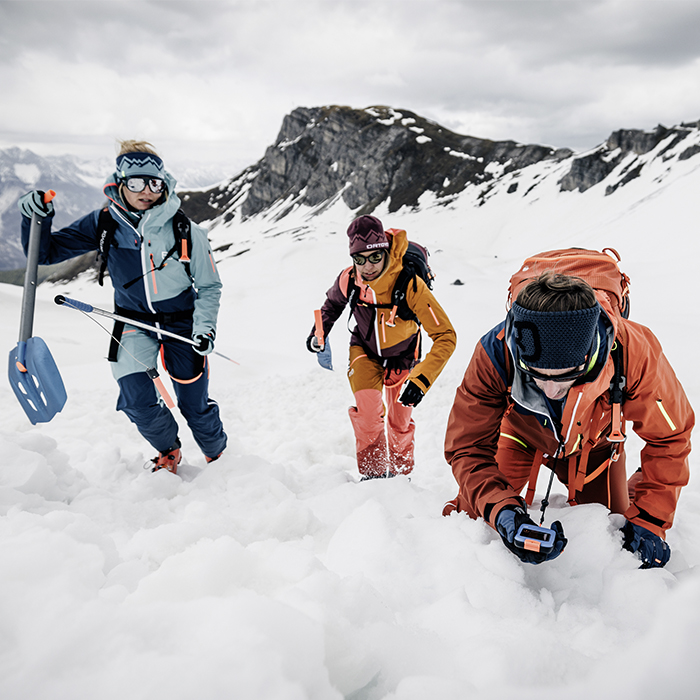
AVALANCHE SEARCH PROCEDURE

When it comes to speed and precision, the procedure used when searching for avalanche burial victims can be compared to the “airport approach”.  

The closer an airplane gets to the airfield, the slower it flies, so that it can descend just before landing, land on the runway and come to a stop. (Source: mountainsafety.info)

Avalanche burial victims

THE FOUR PHASES OF SEARCHING FOR AVALANCHE BURIAL VICTIMS 

The four phases in the search for avalanche burial victims are: 

Signal search:
In the signal search, the searcher systematically walks along the avalanche deposit zone awaiting the first reception of a signal from the burial victim. 

Coarse search:
In the coarse search, the searcher gets closer to the burial victim (three to five meters away). To do this, they follow the display on their avalanche transceiver, which will lead them in an arc along a field line to the burial victim.

Fine search: 
In the fine search, the suspected location of the victim is determined using an avalanche transceiver. To do this, the transceiver is moved in a “cross” pattern over the victim at close range, searching for the lowest distance value. This point marks the suspected burial location.

Pinpointing the location:
The victim’s exact burial location is now determined using an avalanche probe. Following the search, the burial victim is systematically shoveled free and given first aid. Each of the basic search phases has its “crucial points” that you should know and practice. 

VIDEO

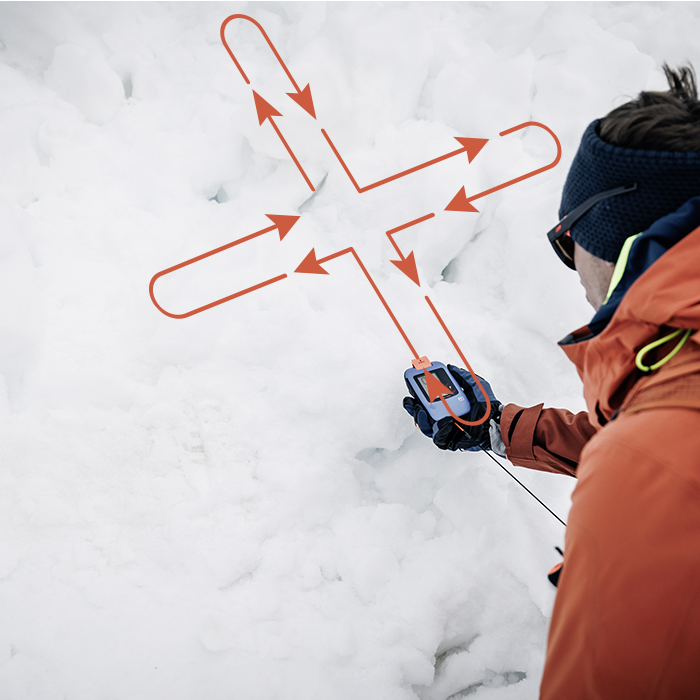
SEARCHING FOR BURIAL VICTIMS USING AN AVALANCHE TRANSCEIVER

COMPANION RESCUE WITH ONE SEARCHER 

If the rescuer is alone in the avalanche deposit zone, or if they are the only person experienced in avalanche transceiver search,  they must conduct the entire search and, if necessary, the probing to pinpoint the location, then do the shoveling on their own.

SIGNAL SEARCH SIGNAL SEARCH COARSE SEARCH COARSE SEARCH FINE SEARCH FINE SEARCH

WITH THE EYES AND EARS

In the signal search, the rescuer searches the avalanche deposit zone or primary search area using their avalanche transceiver, walking in a meandering S-shaped or zigzag pattern . Depending on the search-strip width of their device (generally between 20 and 40 meters), they do this while rapidly descending the avalanche deposit zone. The search speed should be adapted to the hardness of the snow in the deposit zone; you can jog or run, but at the very least walk quickly. While doing so, the device is to be held steadily in front of the body (without rotating).

Important: The searchers should not stare at the transceiver display during the signal search. Instead, they should focus on the avalanche deposit zone (searching with their eyes and ears), because parts of the burial victims may be visible (arm, ski, pole) or calls for help might be heard.  The avalanche transceiver will sound a loud beep when it receives the first signal.

ARE ANY OBJECTS VISIBLE?

If one of the searchers sees objects in the snow, they should rush over and check whether they receive the first signal there. The objects should be pulled out of the snow and stuck back in the same place in a way that makes them clearly visible. The searcher then continues their planned meander (search strips).

FIRST RECEPTION

If your avalanche transceiver registers a first reception, it will signal this with a loud, rhythmic sound. Now you will see a directional arrow and the distance displayed on the screen. 

If the signal continues rhythmically, this is known as a “stable first reception”. If the signal is not constant, you should continue your search strip until the signal is permanent, rhythmic and a directional arrow and distance value are displayed (stable first reception).

FOLLOW THE DIRECTIONAL ARROW

Now the searcher can follow the arrow. At the beginning, they should check whether the distance is actually decreasing. If not, they are moving away from the burial victim, because the directional arrow only ever shows the “field line axis”. Only some avalanche transceivers recognize whether you are actually moving in the right direction after a certain amount of time.

Once you are moving in the right direction, you can move swiftly along the field line (in an arc) toward the burial victim – always following the directional arrow. 

Caution: once the display reaches 10 meters, you should move significantly more slowly and follow the arrow exactly. Once it reaches five meters, you should move the avalanche transceiver slowly down to the snow surface until it is directly above the snow at three meters distance.

The last phase of the coarse search is prone to error. For this reason, you must move slowly and precisely to avoid “running over” the burial victim or missing the “runway” (the first axis of the cross in the fine search).

AT THE SNOW SURFACE

In the fine search, the avalanche transceiver is moved directly over the surface of the snow. The best way to do this is to kneel and move very slowly – at a speed of around 25 to 30 centimeters per second.

While doing so, the device must no longer be rotated and you should search the first axis (“runway” to determine the point of lowest distance. This requires first moving over and past the point of lowest distance to ensure that you don’t “cross” too early.  Once you have received an increasing distance three times in a row, you can be sure you have found the point of lowest distance in the axis.

SUSPECTED BURIAL LOCATION

The point of lowest distance should be marked with an object (glove, beanie, etc.). You then immediately move the avalanche transceiver back to this point and “scan” the second access at a right angle to the first axis (“making a cross”). As with the first axis, you should determine the closest distance and mark it as the suspected burial location, provided this point is no more than around a meter to the side of the first axis. If the point is significantly further to the side of the first axis, it means that you didn’t work precisely enough at the end of the coarse search; you should therefore now search a third axis at a 90 degree angle. 

Once the closest distance has finally been determined in the fine search, this phase ends. Now comes pinpointing, or probing.

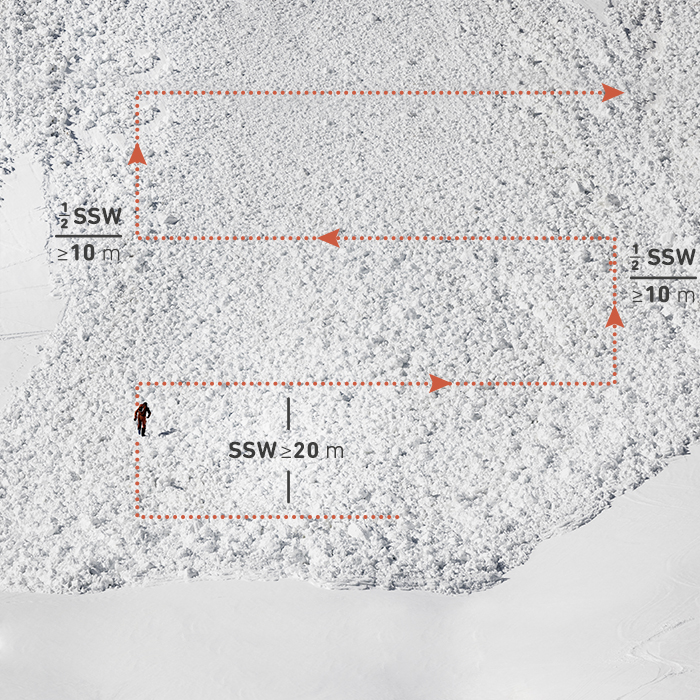
COMPANION SEARCH WITH SEVERAL SEARCHERS

If the avalanche deposit zone is very large or there are several burial victims and enough rescuers are available, the deposit zone should be searched by several people. Here, the coordinator has the important job of maintaining an overview of which areas of the deposit zone have already been searched and which have yet to be searched.
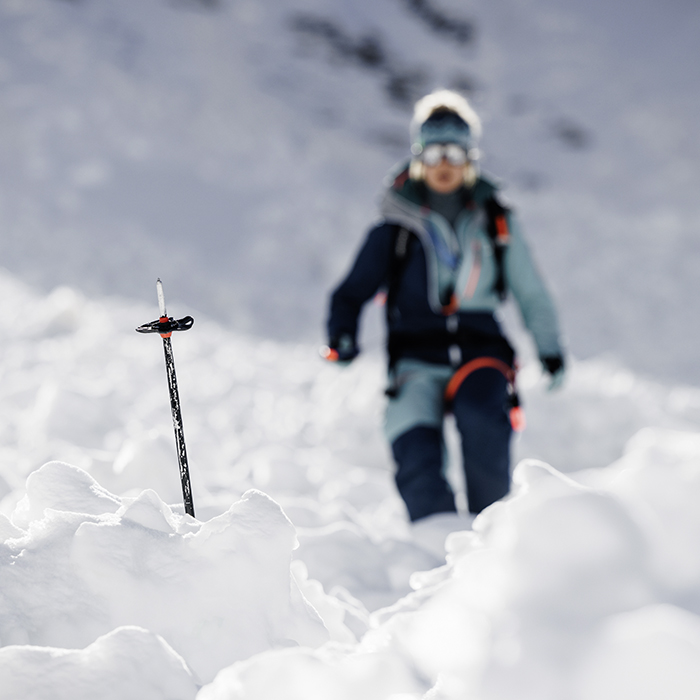
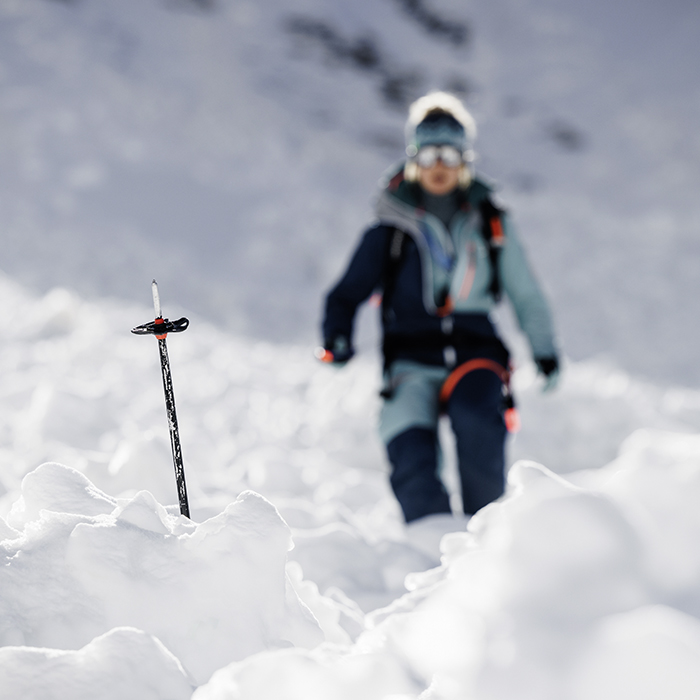
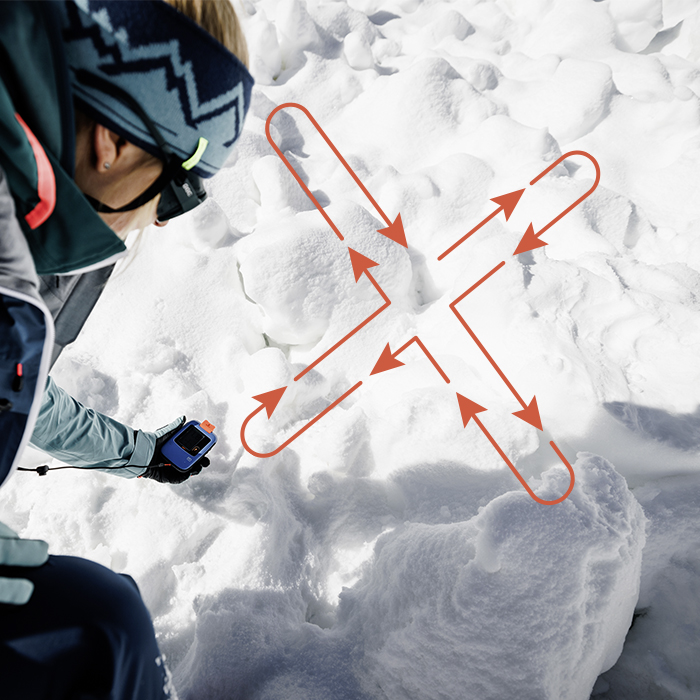
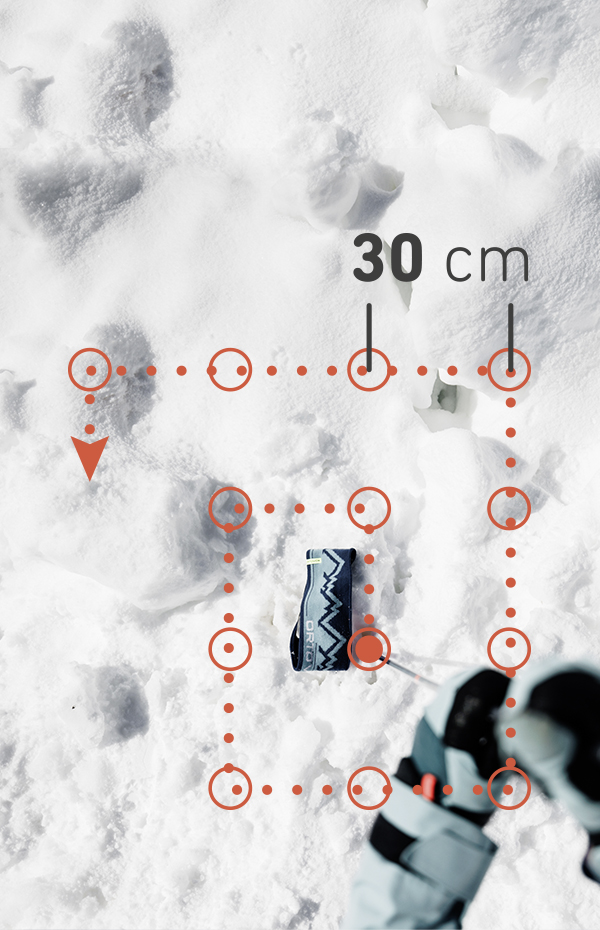
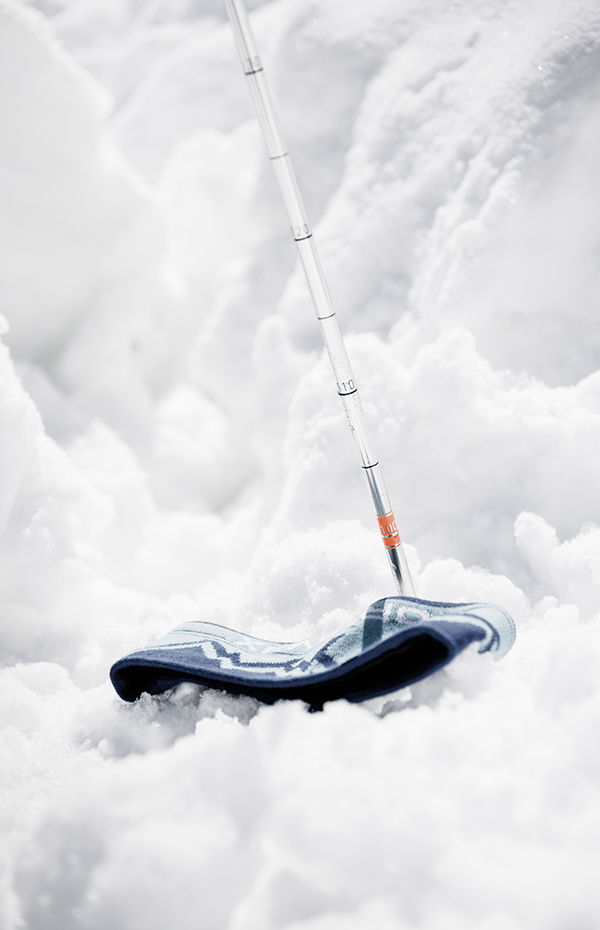
SIGNAL SEARCH SIGNAL SEARCH SIGNAL SEARCH COARSE SEARCH FINE SEARCH FINE SEARCH

SEARCH STRIPS

For the signal search, the searchers stand at the edge of the avalanche deposit zone or the search area at intervals that correspond with the search-strip width (20 to 40 meters). If there are several searchers, it’s often betters to choose a narrower search-strip width (20 meters). Because as soon as the first searcher receives a signal and follows it, the searchers next to them must take over their search strip and close the gap; in this area, the search-strip width is then widened to 40 meters.  

The search speed should be adapted to the hardness of the snow in the deposit zone; you can jog or run, but at the very least walk quickly. While doing so, the device is to be held steadily in front of the body (without rotating).  All searchers walk or run along their search strips until they get the first reception of a signal.

WITH THE EYES AND EARS

As with a signal search carried out by just one person, in this phase all searchers should focus their attention on the avalanche deposit zone and not on the avalanche transceiver display (searching with their eyes and ears). If parts of the burial victim are visible (arm, ski, pole) or cries for help can be heard, they should immediately hurry to the place in question and check for a signal there.

FIRST RECEPTION

Should a searcher receive a signal, they should share this loudly with the coordinator and other searchers. Subsequently, the planned search paths might need to be changed so that the whole of the remaining field can be searched on other search strips

FOLLOW THE DIRECTIONAL ARROW

As with a single searcher, the approach toward the burial victims continues along the field lines  – always following the directional arrow on the display. The coordinator should proactively send a team of helpers with a probe and shovels to the searchers, who are now in the coarse search phase. The remaining searchers should continue the signal search and swiftly walk or run along their search strips until they get the first reception of a signal. 

From 10 meters away,  you should move significantly slower and follow the arrow exactly. Once it reaches five meters, you should move the avalanche transceiver slowly down to the snow surface until it is directly above the snow at three meters distance.

PREPARING TO PROBE

In the fine search, the searcher very slowly moves the avalanche transceiver along an axis (without rotating it) directly above the snow surface to determine the point with the closest distance.

During this time, the team with the probe and shovels can get ready for the pinpointing phase without disturbing the searcher. 

Until the end of the fine search, the searcher should regularly announce the distances so the people who will be probing can prepare themselves for the probing depth and immediately begin pinpointing.

SUSPECTED BURIAL LOCATION

Starting from the point of closest distance, you should now search the second axis at a 90 degree angle to the first axis (“making a cross”). As with the first axis, you should determine the closest distance and use an object (glove, beanie, etc.) to mark it as the suspected burial location. 

With this, the search phase ends and pinpointing (probing) begins.

CORRECT PROBING

To ensure probing runs as smoothly and efficiently as possible, you need to work systematically. The suspected burial location is searched in a grid formation with intervals of approx. 30 centimeters (approx. the length of a boot). A “chessboard grid” has proven to be the most effective. This can then be worked through crosswise or in the form of a spiral.

VIDEO

THE CORRECT WAY TO PROBE AFTER AN AVALANCHE
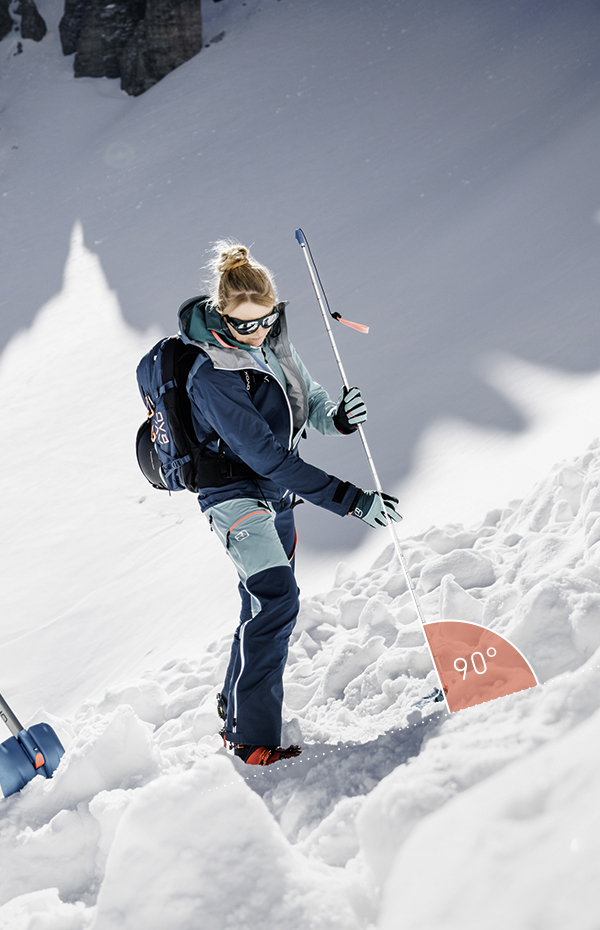
PROBING

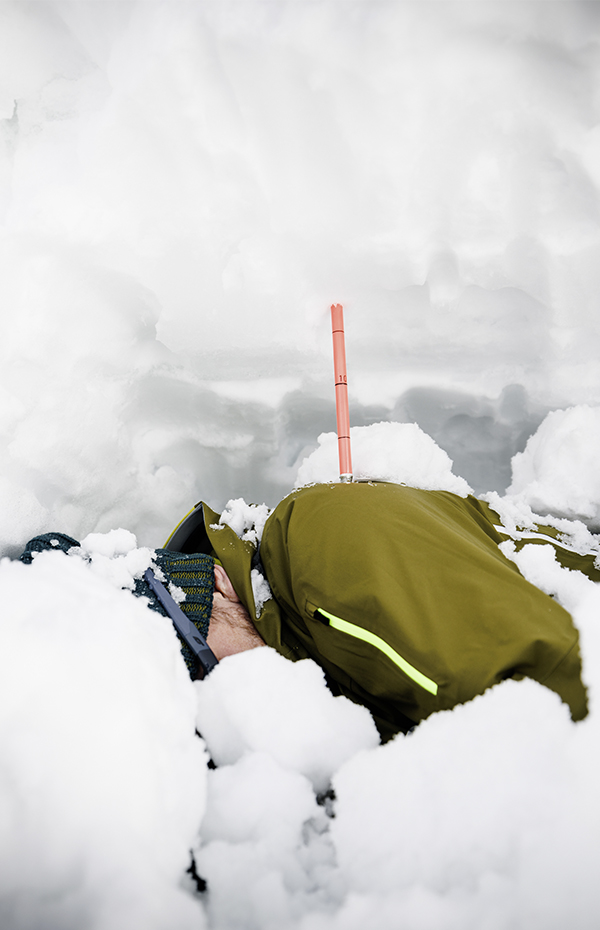
SYSTEMATIC PINPOINTING

Probing saves you valuable shoveling time. If you get a “hit” with the avalanche probe – i.e. you hit an object in the snow – you can read the exact burial depth on the probe and work precisely toward the burial victim. If you were to start digging toward the suspected burial location immediately after the avalanche transceiver search, i.e. without probing, you would have to move twice as much snow.

PROBE DIRECTION INSERT ANGLE SPEED AND GRID PROBE DEPTH AND “HIT”

PROBE DIRECTION

You should always begin in the middle, where you have marked the suspected burial location. From here, you move around the first probe point and then again around the inner nine probe points. With these 25 probe points, you will have quickly “scanned” approx. two square meters and should be able to locate the burial victim.

INSERT ANGLE

It is important to always insert the probe at the same angle: around 90 degrees to the snow surface. If you were to vary this angle, it would mean that a relatively large area below the surface would go unprobed.

SPEED AND GRID

To work efficiently, you need to keep up a swift pace while probing. You must also ensure that every area (insert hole) is probed only once and no area is missed.

PROBE DEPTH AND “HIT”

The probe should be inserted vigorously to a depth of at least one and a half times the closest distance displayed on the avalanche transceiver. If the closest distance and, therefore. the suspected burial depth is approx. one meter according to the avalanche transceiver, the probe should be inserted at least 1.5 meters deep (so for common probes with a segment length of 40cm this is down to the fourth segment). 

If the insert depth suddenly deviates from this, it is very likely a “hit” and you will feel a bouncy resistance. A human body underneath the snow feels soft and “bouncy”, while stones feel hard and make a “clack” sound and the ground feels soft and “sticky”. 

If you get a hit, the probe should stay in place to serve as a marker. You should begin shoveling from a distance of one and a half times the burial depth. If the deposit zone is sloped in this area, you should begin shoveling from below and work laterally toward the burial victim from there.

VIDEO

THE CORRECT WAY TO SHOVEL AFTER AN AVALANCHE

SHOVELING

THE MOST TIME-CONSUMING PART OF THE RESCUE

Of all of the phases in a rescue, shoveling generally takes the most time. While a well-practices avalanche transceiver search will have determined the burial location within approx. two to three minutes and there’ll be a probe hit within another 30 seconds to a minute, you often need four to five minutes to free the burial victim. When doing so, it is important to get to their head as quickly as possible.

SHOVELING STRATEGIES

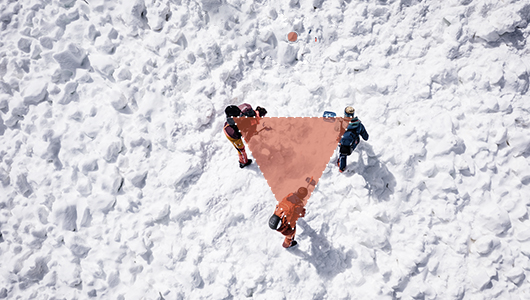
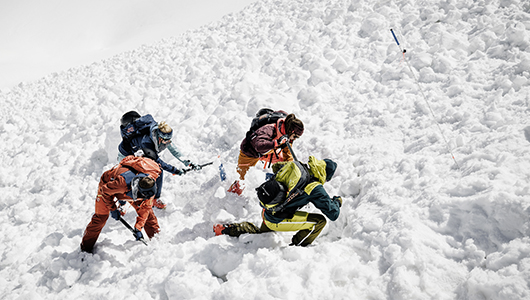
The more helpers there are to shovel, the more quickly you will reach the burial victim. The V-system has established itself as the best strategy (with three people shoveling): In this system, two people stand parallel to one another at the front, while a third person stands behind them to clear away the snow they dig out. The aim is to create a wide access ramp to the burial victim and dig toward their head as quickly as possible.

SHOVELING ALONE

If you have to shovel alone, you need to have a good shovel and be in good physical condition. When digging alone, you again start digging from a distance of one and half times the burial depth downhill from the probe, and work toward the burial victim by creating a type of ramp. If the avalanche snow is harder, you should first dig out blocks of snow and then clear these away behind you to the side. The last segment of the probe (ideally marked in a color) indicates when you need to start working more carefully to avoid injuring the burial victim with the shovel blade. When you are directly next to the burial victim, the best thing to do is use your hands to free them.


THREE PEOPLE SHOVELING

The most effective method is for three people to shovel in a V-formation. While two people work toward the burial victim at the front, the third person is positioned behind to clear away the snow. If one of the shovelers at the front gets tired, they should switch places; or you should rotate positions every 60 seconds.


The last segment of the probe (ideally marked in a color) indicates when you need to start working more carefully to avoid injuring the burial victim with the shovel blade. When you are directly next to the burial victim, the best thing to do is use your hands to free them.


vs

TWO PEOPLE SHOVELING

If there are two of you, you begin shoveling in parallel next to one another and work toward the burial victim the same way you would if you were alone. As two of you can clear a wider ramp, you will get to the head more quickly. The last segment of the probe (ideally marked in a color) indicates when you need to start working more carefully to avoid injuring the burial victim with the shovel blade. When you are directly next to the burial victim, the best thing to do is use your hands to free them.


FOUR PEOPLE SHOVELING

If there are four of you, two people shovel in parallel at the front and two in parallel at the back. Here again, the front and back shovelers should switch places every 60 seconds. If the shovels used for clearing have been set to their clearing function,  these should be left in place and only the people switch places. The last segment of the probe (ideally marked in a color) indicates when you need to start working more carefully to avoid injuring the burial victim with the shovel blade. When you are directly next to the burial victim, the best thing to do is use your hands to free them.


MULTIPLE BURIAL VICTIMS MULTIPLE BURIAL VICTIMS MULTIPLE BURIAL VICTIMS

MULTIPLE BURIAL VICTIMS

While you can quickly locate one burial victim alone using a modern avalanche transceiver, multiple burials within the reach of one device is a technical challenge. Experienced ski tourers and freeriders should practice this and be able to manage it.

The same rules as when searching for a single victim apply here. When moving closer to the first burial victim, you will receive notification on your device that there are other burial victims (transmitters) within reach. In this case, several people (little figures) will generally be displayed on the screen.

As all modern devices lead the searcher to the strongest signal first and “suppress” all other signals they pick up, locating the first burial victim should not be a problem. However, you have to assume that in the fine search and while you are moving closer, there may be overlapping signals from different transmitters. The more transmitters there are in the range of the searching device, the more often the device will register more signals simultaneously.

This can mean that the signal being received cannot be measured. There are “dropouts” or a previously measured value is displayed on the avalanche transceiver. You will know when this happens because the number on the display will not change even though you are moving as part of the coarse search. In the fine search, you will receive the same distance over several pulses and, therefore, a big “value plateau”.  This can confuse inexperienced searchers. It is thus important to work very slowly if there are several transmitters in reach. 

Once you have located the first burial victim (transmitter) and helpers are ready to probe and shovel, you can move on to the next-closest burial victim (transmitter). To do this, you flag (“mask”) the current transmitter signal from close-by – generally by using the flag button. This lets the device know that it should not display the closest signal but only the directional arrow (field line) and distance for the next-closest transmitter.

You then move closer to this transmitter as before, pinpoint the burial location, and continue with the search. 

The fact that the flagged transmitter is continuing to transmit and possibly disrupting the signal being received on the searcher’s avalanche transceiver can be a hindrance. Therefore, having an enormous range is not always helpful.

AVABAG LITRIC TOUR 30

LITRIC

Versatile and lightweight: The AVABAG LiTRIC TOUR 30 is a ski touring backpack with a LiTRIC avalanche airbag system.

TO THE WEBSHOP

DIRACT VOICE

Avalanche Transceivers

ORTOVOX is setting out on a new, innovate path: The DIRACT VOICE is the world's first avalanche transceiver with integrated voice navigation and will reliably and quickly guide you to your buried companion in an emergency.

TO THE WEBSHOP

CARBON 280+ PFA

AVALANCHE PROBES

Carbon is lightweight and rigid, and therefore the ideal material for our high-end probes. This lightweight carbon probe is 280cm long and has all the features of a true professional probe.

TO THE WEBSHOP

SHOVEL KODIAK

AVALANCHE SHOVELS

Tough mountaineering shovel with unique clearing function and practical D-grip! Our KODIAK shovel boasts the largest shoveling volume (3.1 liters) in our product line, so it can safely be called the fastest of the bunch.

TO THE WEBSHOP

BIVY DOUBLE

BIVY BAGS

Are there two of you on tour? Then a two-person bivi bag will be sufficient. The BIVY DOUBLE is suitable for two people and like all our bivi bags has kept its the bright “shocking orange” color. This means search parties can find you more quickly.

TO THE WEBSHOP